









Rolling Bar Cart
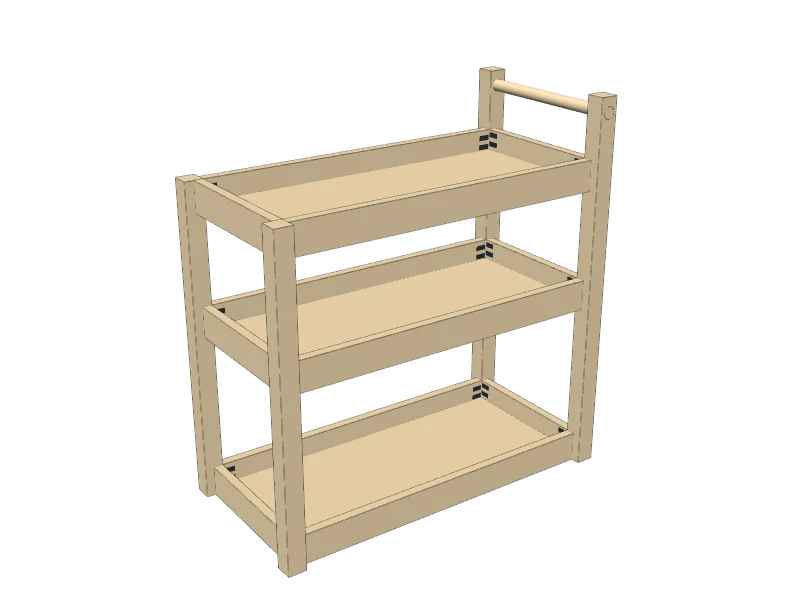
A rolling bar cart with three railed trays: tall bottles on the bottom, glasses in the middle, and a top tray for mixing. A dowel handle doubles as a towel bar, and it rolls on locking casters.
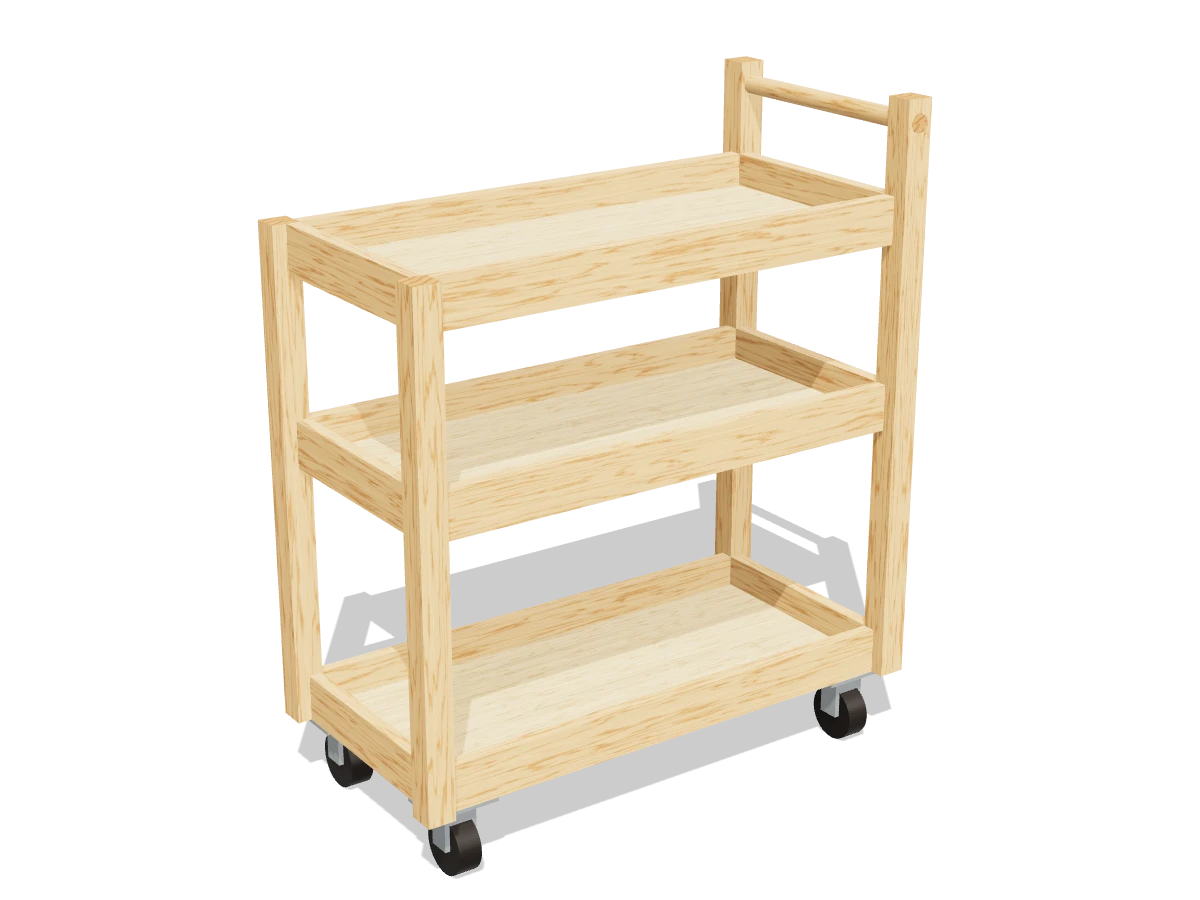
- Skill
- Level 2 of 5 · Beginner
- Build time
- 5 to 7 hours, plus finish
- Lumber
- 2 2x2s, 3 1x3s and 2 panels of ¾″ plywood
- Joinery
- Pocket holes and glue
- Each tray
- 27″ × 11¾″ inside, 13¼″ of headroom on the bottom tray and 9¼″ on the middle one
- Finished size
- 30″ L × 14¾″ W × 35½″ H
A 2x2 is actually 1½″ × 1½″ and a 1x3 is ¾″ × 2½″. Every measurement in this plan uses the real size. ¾″ plywood is drawn at full thickness, but plywood sold that way is often a hair thinner, so measure yours and cut the pieces that fit between panels to match.
Shopping list
- 22x2, 8 ftPosts. Pick the straightest ones in the pile.
- 21x3, 8 ftRails. Select pine or poplar.
- 11x3, 6 ftRails. Select pine or poplar.
- 2¾″ plywood, 2 × 4 ft panelShelves. Birch or another smooth plywood.
- 1 set3″ locking plate casters, set of 4Two locking. About 4″ tall overall.
- ~20#10 × ⅝″ pan-head screwsFor the caster plates.
- 11″ hardwood dowel, 36″For the handle. Cut it to 14¾″.
- ~901¼″ coarse-thread pocket-hole screws
- 1Wood glue
- —Sandpaper, 120 and 180 grit
- 1PolyurethaneWipes clean after spills.
- opt.Wood stainBefore the polyurethane.
Tools
- Miter saw or circular saw
- Circular saw or table sawWith a straight guide, for the plywood shelves.
- Pocket-hole jigSet for ¾″ material.
- Drill/driver with a 1″ spade bitOr a 1″ Forstner bit, for the handle holes.
- ClampsTwo that open 30″ or more.
- Random orbit sander
- Speed square, tape measure, pencil
Cut list
| Part | Qty | Size, inches | From |
|---|---|---|---|
| APosts | 2 | 1½ × 1½ × 26½ | 2x2 |
| BHandle postsWith a 1″ hole for the handle. | 2 | 1½ × 1½ × 31½ | 2x2 |
| CLong rails | 6 | ¾ × 2½ × 27 | 1x3 |
| DShort rails | 6 | ¾ × 2½ × 11¾ | 1x3 |
| EShelves | 3 | ¾ × 11¾ × 27 | ¾″ plywood |
Board layout. Each row is one board, cut left to right, with the remainder hatched. Dark lines are saw cuts, about ⅛″ wide.
Build it
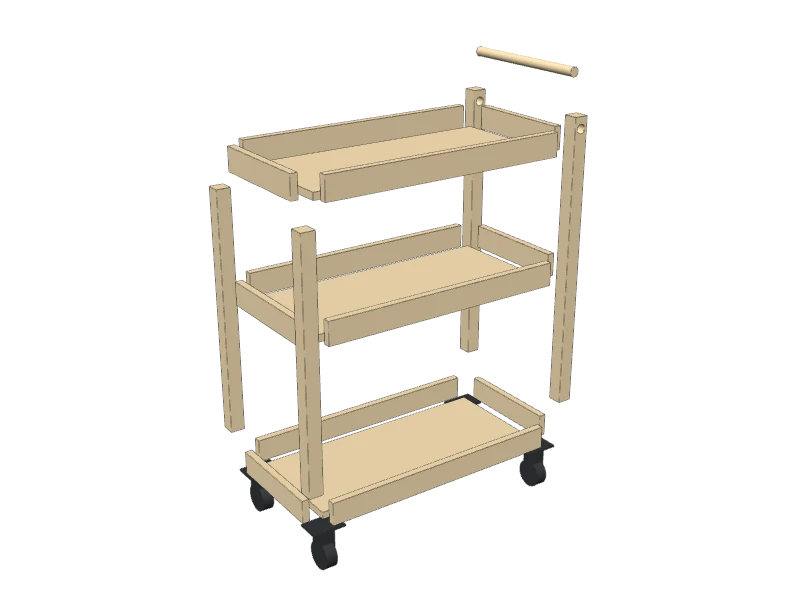 01
Cut the pieces
Cut every piece on the cut list, and cut the 1″ dowel to 14¾″ for the handle:
- A Posts, two at 26½″
- B Handle posts, two at 31½″
- C Long rails, six at 27″
- D Short rails, six at 11¾″
- E Shelves, three at 11¾″ × 27″
TipRip the plywood shelves with a circular saw and a straight guide, then check each one fits between two posts laid side by side on the bench. Every tray depends on them being square.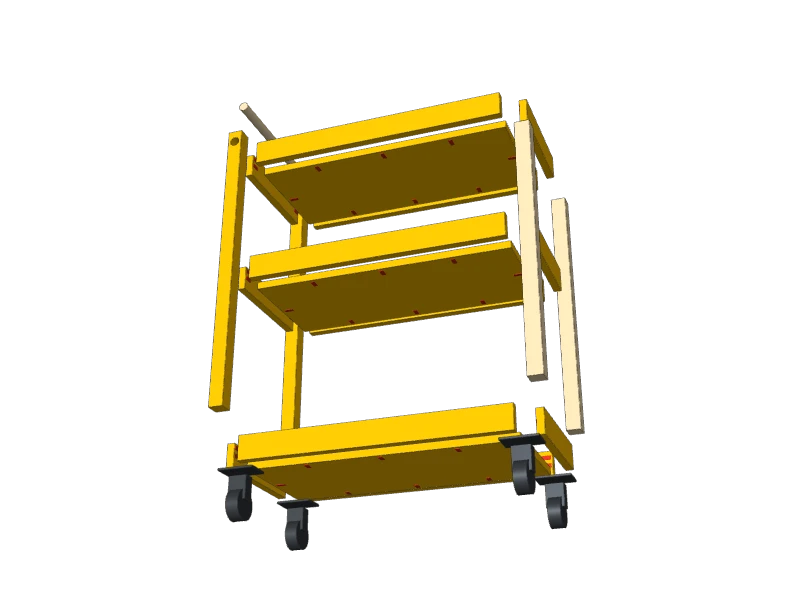 02
Drill the holes
Set your pocket-hole jig for ¾″ material. Drill two pocket holes at each end of every rail (C) and (D), on the inside face. Keep them in the top 1¾″ of the rail, above where the shelf sits. On the short rails (D), drill them a little higher than on the long rails, so the screws from two sides don't meet inside a post.
Drill pocket holes on the underside of each shelf (E): three along each long edge and one in the middle of each short edge.
On each handle post (B), mark the center of the face that will face the other handle post, 1¼″ down from the top end. Drill a 1″ hole straight through with a spade bit or Forstner bit, with a scrap clamped behind so the back doesn't splinter.
 03
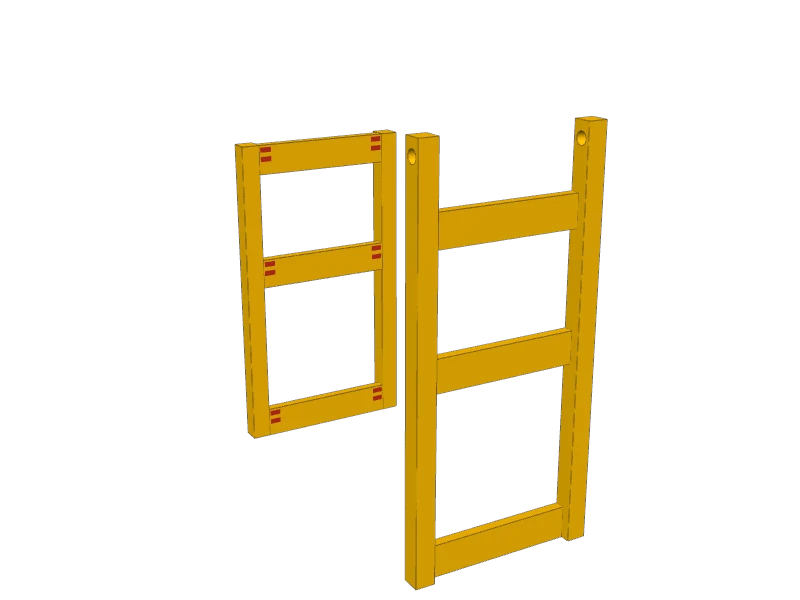
Build the two ends
Lay the two posts (A) on the bench, 11¾″ apart. Fit three short rails (D) between them: one flush with the bottom ends, one with its bottom edge 14″ up, and one flush with the top ends. Set each rail flush with the inside faces of the posts, so it sits ¾″ back from the outside. A ¾″ scrap under the rail does it. Glue and drive 1¼″ pocket screws into the posts.
Build the handle end the same way with the two handle posts (B), the holes at the top and facing each other. The top rail's top edge sits 5″ below their top ends.
 04
Add the back rails
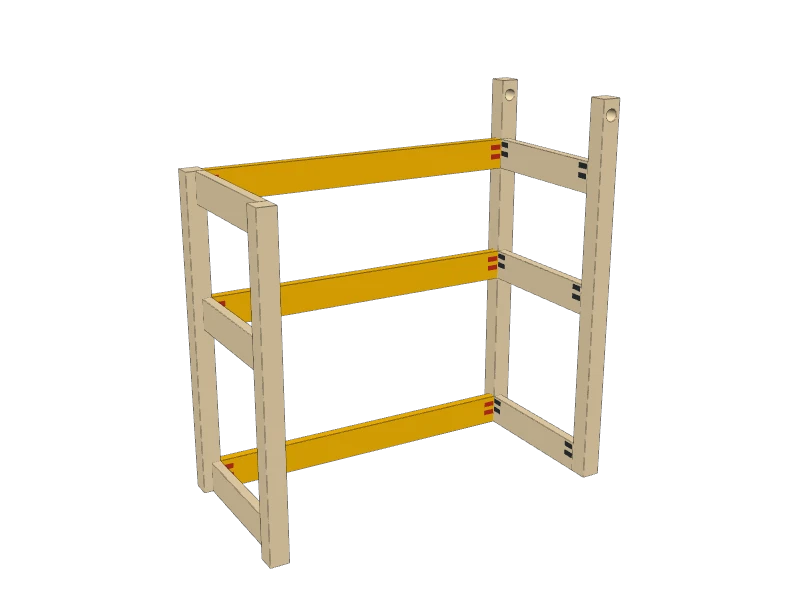
Stand the two ends up and fit a long rail (C) between the back posts at each of the three levels, flush with the inside faces like the short rails. Glue and screw them, then measure corner to corner across the back: the two diagonals should match.
 05
Add the shelves
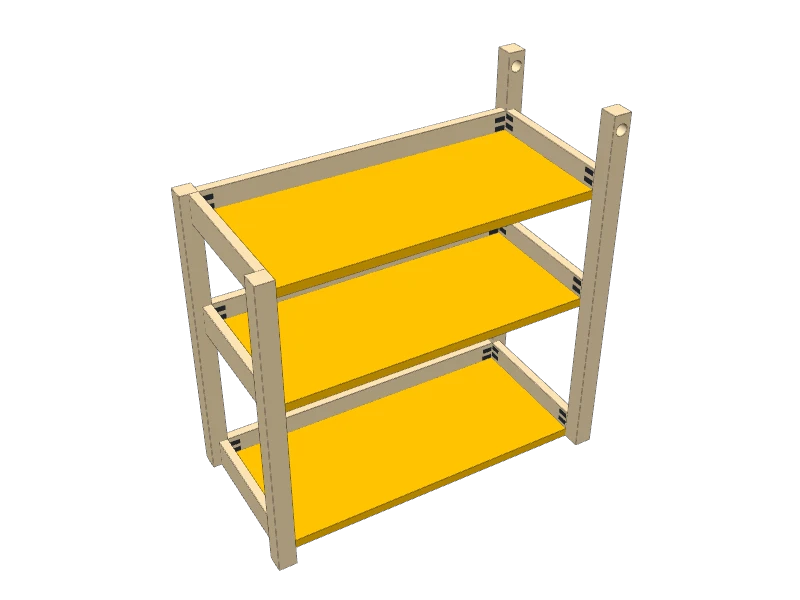
Clamp a straight scrap across the bottom edges of each pair of short rails as a ledge. Slide each shelf (E) in from the front onto its ledge, so it sits flush with the bottom edges of its rails and tight to the back rail. Drive 1¼″ pocket screws into the back rail and the short rails.
 06
Add the front rails
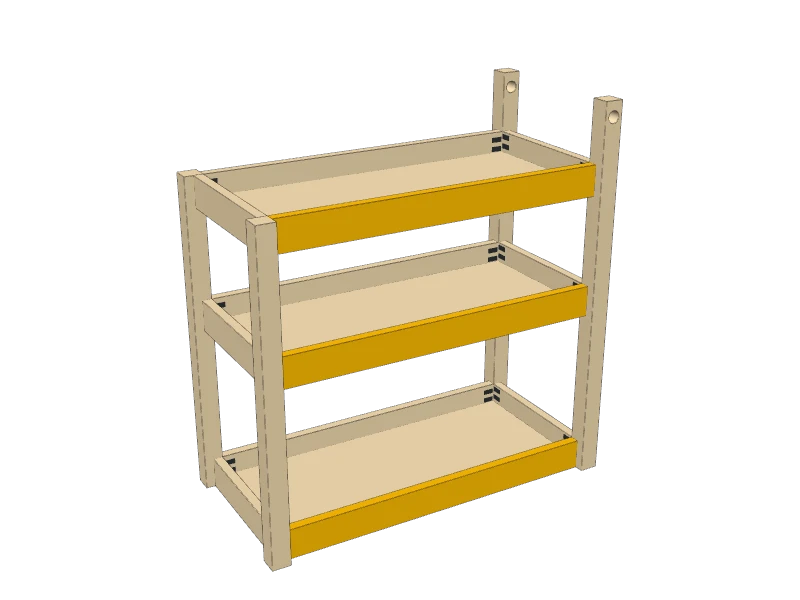
Fit the last three long rails (C) between the front posts, flush with the inside faces and with their bottom edges flush with the underside of each shelf (E). Glue and screw them to the posts, then drive the last pocket screws through the front edge of each shelf into its rail.
Each tray now has a 1¾″ lip all the way round, so bottles and glasses can't slide off when it rolls.
 07
Add the handle
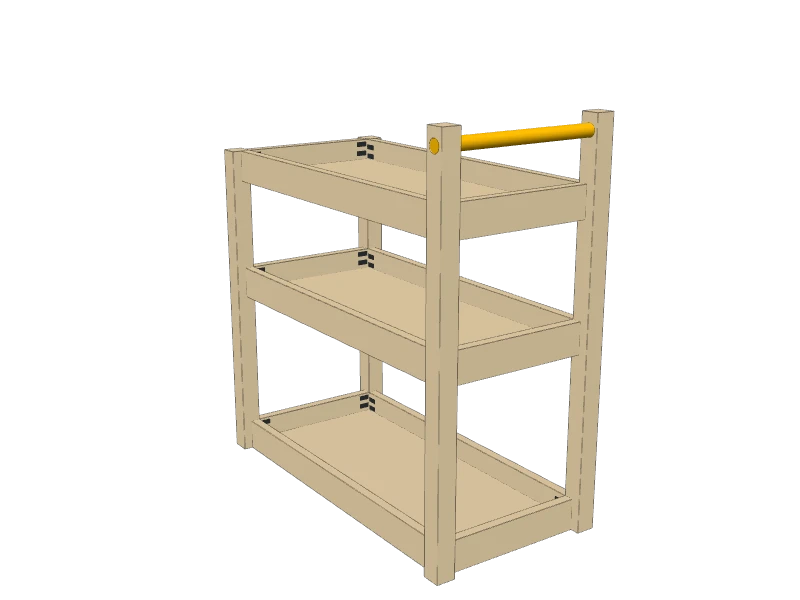
Smear a little glue inside the holes in the handle posts (B). Slide the dowel through both holes until its ends are flush with the outside faces, twisting it as it goes to spread the glue.
The handle doubles as a towel bar. It sits 3¼″ above the rails of the top tray, room for a hand or a folded tea towel.
 08
Sand and finish
Fill the pocket holes with pocket-hole plugs if you like. Sand with 120 then 180 grit and ease every edge, especially the tops of the rails and the handle.
Stain if you like, then give it three coats of polyurethane, sanding lightly between coats. It wipes clean when a drink spills.
 09
Add the casters
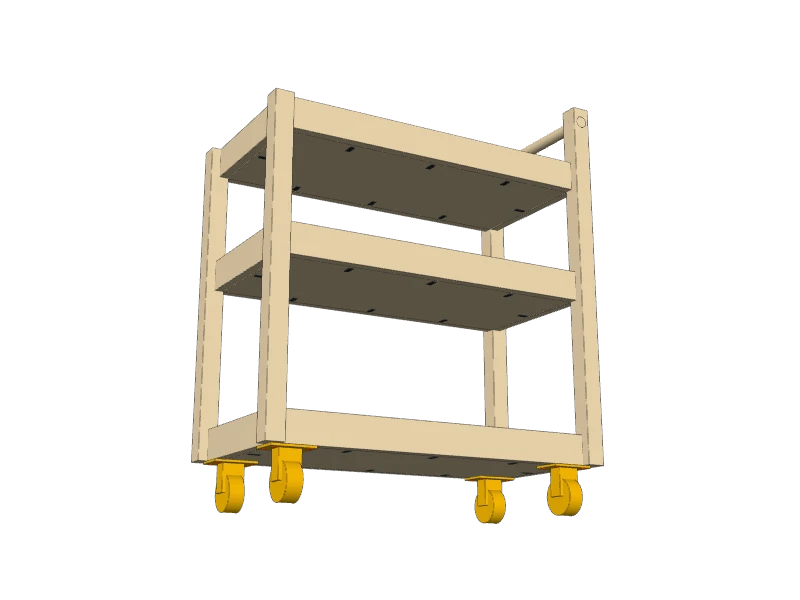
Check your casters' own instructions and their overall height before you drill: the plan is drawn for 4″. Turn the cart upside down on a blanket. Set a caster plate in each corner, ¾″ in from both outside faces, so it covers the post, the ends of two rails and the corner of the bottom shelf (E). Mark the holes, drill ⅛″ pilot holes and drive four #10 × ⅝″ pan-head screws in each.
Put the two locking casters at the handle end, where your foot finds them.
Watch outLock the casters before you mix or pour on it. Push it by the handle, not the top tray, and keep heavy bottles on the bottom tray.
Build at your own risk. Check every measurement against your own lumber before you cut, test-fit before you glue, and wear eye and ear protection.