C-Shaped Sofa Side Table
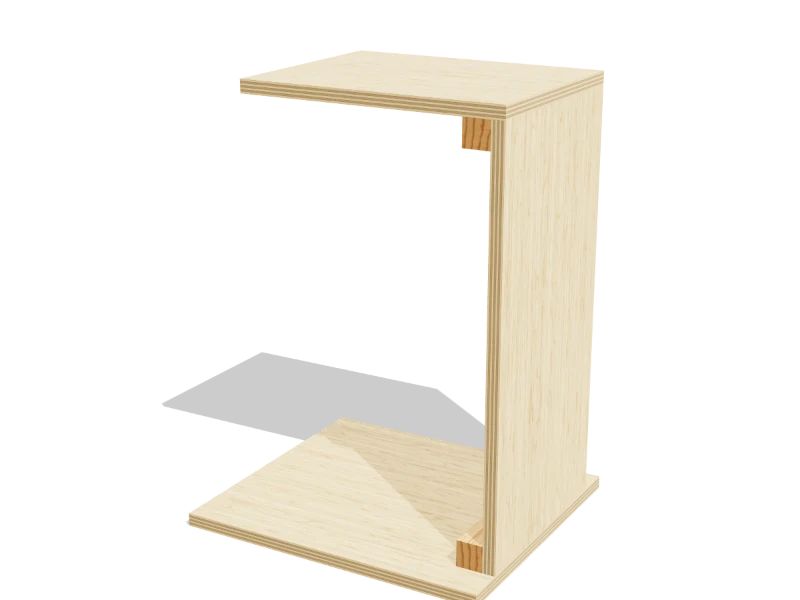
A C-shaped side table that slides under the sofa so the top sits right over the seat: a perch for a laptop, a plate or a cup of coffee. Plywood and one 2x2, on a wide base that keeps it steady.
- Skill
- Level 2 of 5 · Beginner
- Build time
- 3 to 4 hours, plus finish
- Lumber
- 1 2x2 and 1 panel of ¾″ plywood
- Joinery
- Glue, cleats and screws
- Fits
- Sofas with 2½″ of space under the front and a seat under about 22″ high
- Finished size
- 16″ W × 18″ D × 25″ H
What you need
A 2x2 is actually 1½″ × 1½″. Every measurement in this plan uses the real size. ¾″ plywood is drawn at full thickness, but plywood sold that way is often a hair thinner, so measure yours and cut the pieces that fit between panels to match.
Shopping list
- 12x2, 8 ftThe two cleats. Pick a straight, dry one.
- 1¾″ plywood, 2 × 4 ft panelBirch or another smooth plywood, good on one face.
- ~122″ wood screwsThrough the cleats.
- ~101½″ wood screwsUp through the base.
- 1Wood glue
- opt.Iron-on edge banding¾″ wide, about 14 ft, for the plywood edges.
- 4Felt padsUnder the base, so it slides under the sofa.
- —Sandpaper, 120 and 180 grit
- 1Paint or stain and polyurethane
Tools
- Circular sawWith a straight guide, for the plywood.
- Miter saw or hand sawFor the cleats.
- Drill/driverWith a countersink bit.
- ClampsTwo that open 12″ or more.
- Clothes ironFor the edge banding.
- Random orbit sander
- Speed square, tape measure, pencil
Cut list
Five pieces from one board and one panel. Label each piece with its letter in pencil as you cut it.
| Part | Qty | Size, inches | From |
|---|---|---|---|
| ABase | 1 | ¾ × 16 × 18 | ¾″ plywood |
| BUpright | 1 | ¾ × 11¾ × 23½ | ¾″ plywood |
| CTop | 1 | ¾ × 11¾ × 15 | ¾″ plywood |
| DCleats | 2 | 1½ × 1½ × 11¾ | 2x2 |
Board layout. Each row is one board, cut left to right, with the remainder hatched. Dark lines are saw cuts, about ⅛″ wide.
Hardware & tools
Everything besides the lumber, with a link for each.
Links go to Amazon. Woodable earns a small commission at no cost to you.
Hardware
- Iron-on edge banding¾″ wide, about 14 ft, for the plywood edges.opt.View on Amazon
- Felt padsUnder the base, so it slides under the sofa.4View on Amazon
Fasteners
- 2″ wood screwsThrough the cleats.~12View on Amazon
- 1½″ wood screwsUp through the base.~10View on Amazon
Glue & finish
- Wood gluePVA wood glue for indoor projects.1View on Amazon
- Sandpaper, 120 and 180 grit5″ hook-and-loop discs for a random orbit sander, 80 to 220 grit.View on Amazon
- Clear polyurethaneWater-based polyurethane, satin, for a clear topcoat.View on Amazon
- Wood stainOil-based or water-based interior wood stain.View on Amazon
- Furniture paintInterior paint for furniture: chalk-style or acrylic enamel.View on Amazon
Tools
- Circular sawWith a straight guide, for the plywood.View on Amazon
- Miter saw or hand sawFor the cleats.View on Amazon
- Drill/driverWith a countersink bit.View on Amazon
- ClampsTwo that open 12″ or more.View on Amazon
- Random orbit sander5″ random orbit sander.View on Amazon
- Speed square7″ rafter square for marking and guiding cuts.View on Amazon
- Tape measure25 ft tape measure.View on Amazon
Build it
Seven steps. The 3D view follows along as you scroll. The parts you're working on are yellow, and the screws for that step are red.
- 01
Cut the pieces
All three plywood panels come from one 2 × 4 ft panel. With a circular saw and a straight guide, cut the base off one end first, then rip what's left into two strips for the upright and the top, and cut them to length. Cut the two cleats from the 2x2:
- A Base, one at 16″ × 18″
- B Upright, one at 11¾″ × 23½″
- C Top, one at 11¾″ × 15″
- D Cleats, two at 11¾″
TipCheck each panel is square by measuring corner to corner both ways. A C-table shows every crooked cut. - 02
Band the edges
This step is optional, but it makes plywood look like solid wood. Iron edge banding onto every edge that shows: all four edges of the top (C), both long edges of the upright (B), and the front and side edges of the base (A). Trim the overhang flush with a sharp utility knife and sand the corners smooth.
- 03
Fix the cleats to the upright
Lay the upright (B) good face down. Glue a cleat (D) across the back face at each end, flush with the end and both long edges. Pre-drill and countersink three holes in each cleat and drive 2″ screws through the cleat into the upright.
Watch outThe upright is only ¾″ thick. Use 2″ screws, no longer, so the tips stop inside it. - 04
Add the base
Spread glue on the bottom end of the upright (B) and the bottom face of the lower cleat (D). Stand them on the base (A), flush with its front edge and 2⅛″ in from each side, with the cleat on the inside of the C. Clamp them down.
Tip the whole thing on its side. Pre-drill and drive 1½″ screws up through the base: three into the end of the upright and three into the cleat.
- 05
Add the top
Spread glue on the top end of the upright (B) and the top face of the upper cleat (D). Set the top (C) on them, flush with the front and both sides, and clamp it. Drive three 2″ screws up through the cleat into the top. Check the top is square to the upright before the glue sets.
- 06
Sand and finish
Fill the screw holes under the base, sand everything with 120 then 180 grit and ease every edge. Paint it, or stain it and give it three coats of polyurethane for a top that wipes clean.
- 07
Fit it to the sofa
Stick a felt pad under each corner of the base so it slides without scratching the floor. Slide the base under the front of your sofa until the upright touches it, and the top sits over the seat.
Your sofa needs 2½″ of space under its front edge for the base and the lower cleat, and a seat no higher than about 22″ so the top clears it.
Watch outThe top hangs out over the seat. It's made for a laptop, a plate or a drink, not for sitting or leaning your weight on the far end. Keep kids from climbing on it.
Build at your own risk. Check every measurement against your own lumber before you cut, test-fit before you glue, and wear eye and ear protection. Full disclaimer.