Sliding Barn Door
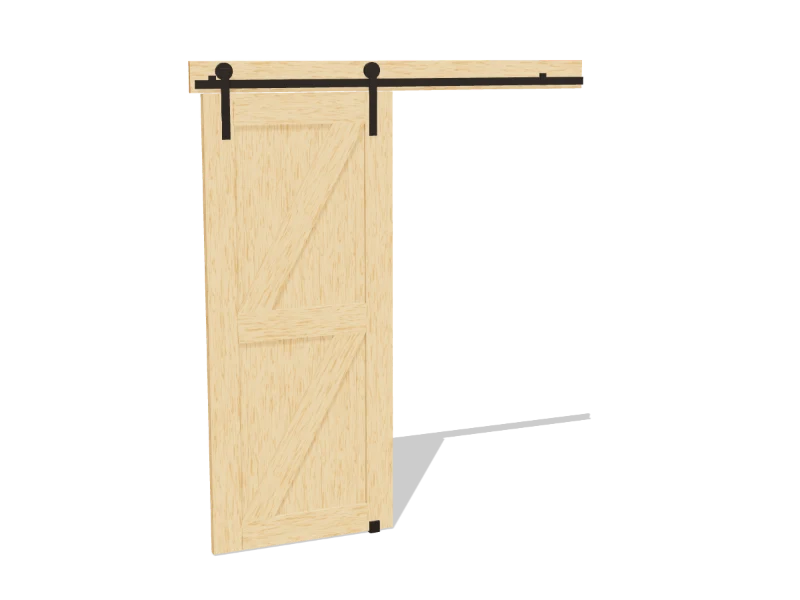
A plank barn door with a Z-braced frame, hung on a sliding track above the doorway. Built from 1x8s and 1x6s to fit a standard opening up to 34″ wide.
- Skill
- Level 3 of 5 · Intermediate
- Build time
- 6 to 8 hours, plus finish
- Lumber
- 5 1x8s and 5 1x6s
- Joinery
- Glue and screws
- Door
- 36¼″ × 84″, 1½″ thick, about 50 lb
- Finished size
- about 80″ W × 3″ D × 90″ H
What you need
A 1x8 is actually ¾″ × 7¼″ and a 1x6 is ¾″ × 5½″. Every measurement in this plan uses the real size.
Shopping list
- 51x8, 8 ftThe planks. Pick flat, straight boards.
- 51x6, 8 ftThe frame, braces and header.
- 1Sliding barn door hardware kit, 6.6 ftWith track, hangers, stops and a floor guide. Rated 200 lb or more.
- ~20Bolts and lag screws for the kitThey come with the kit.
- ~203″ structural wood screwsFor the header, into the studs.
- ~501¼″ wood screwsPlanks to the frame.
- 1Wood glue
- 1Barn door pull handle
- —Sandpaper, stain or paint and a clear coat
Tools
- Miter saw or circular saw
- Drill/driver
- Stud finder and level
- Clamps
- Random orbit sander
- Wrench or socketFor the track bolts.
- Tape measure, speed square, pencil
Cut list
Thirteen pieces from ten boards. Label each piece with its letter in pencil as you cut it.
| Part | Qty | Size, inches | From |
|---|---|---|---|
| APlanks | 5 | ¾ × 7¼ × 84 | 1x8 |
| BStiles | 2 | ¾ × 5½ × 84 | 1x6 |
| CRails | 3 | ¾ × 5½ × 25¼ | 1x6 |
| DBracesEnds cut to sit flat on the rails: mark them in place. | 2 | ¾ × 5½ × 41⅞ | 1x6 |
| EHeader board | 1 | ¾ × 5½ × 80 | 1x6 |
Board layout. Each row is one board, cut left to right, with the remainder hatched. Dark lines are saw cuts, about ⅛″ wide.
Hardware & tools
Everything besides the lumber, with a link for each.
Links go to Amazon. Woodable earns a small commission at no cost to you.
Required part
 Sliding barn door hardware kit, 6.6 ftCheck your kit's instructions for the door size, weight rating and the room it needs above the opening before cutting.1 kitView on Amazon
Hardware
- Barn door pull handleA pull handle about 10″ to 12″ long, with bolts long enough for a 1½″ door.1View on Amazon
Fasteners
- 3″ structural wood screwsFor the header, into the studs.~20View on Amazon
- 1¼″ wood screwsPlanks to the frame.~50View on Amazon
Glue & finish
- Wood gluePVA wood glue for indoor projects.1View on Amazon
- Sandpaper5″ hook-and-loop discs for a random orbit sander, 80 to 220 grit.View on Amazon
- Clear polyurethaneWater-based polyurethane, satin, for a clear topcoat.View on Amazon
- Wood stainOil-based or water-based interior wood stain.View on Amazon
- Furniture paintInterior paint for furniture: chalk-style or acrylic enamel.View on Amazon
Tools
- Miter saw or circular saw10″ compound miter saw: square, angled and beveled crosscuts.View on Amazon
- Drill/driverCordless drill/driver with bits.View on Amazon
- Stud finderElectronic stud finder.View on Amazon
- Level24″ level.View on Amazon
- ClampsTwo or more bar clamps that open 24″ or more.View on Amazon
- Random orbit sander5″ random orbit sander.View on Amazon
- Wrench or socketFor the track bolts.View on Amazon
- Tape measure25 ft tape measure.View on Amazon
- Speed square7″ rafter square for marking and guiding cuts.View on Amazon
Build it
Ten steps. The 3D view follows along as you scroll. The parts you're working on are yellow, and the pocket holes or screws for that step are red.
- 01
Cut the pieces
Cut the planks, stiles, rails and header to length. Leave the braces long for now:
- A Planks, five at 84″
- B Stiles, two at 84″
- C Rails, three at 25¼″
- D Braces, two at 41⅞″
- E Header board, one at 80″
Check firstCheck your kit's instructions before cutting: the door width and thickness it takes, the weight rating, and how much room it needs above the opening. This door is 36¼″ wide, 84″ tall and 1½″ thick, for a 6.6 ft kit and an opening up to 34¼″ × 80″. Measure your opening: the door should be 2″ wider than it, and the track at least twice as long as the door. - 02
Lay out the frame
Lay the stiles (B) face down on a flat floor, 36¼″ apart on the outside. Set the three rails (C) between them: one at the bottom, one at the top and one centered, 42″ from the bottom to its center. Check the diagonals match.
- 03
Fit the braces
Lay a brace (D) across each panel from the bottom corner on the left to the top corner on the right, at about 61°. Mark where the rails cross it, cut on the lines, and drop it in. It should fit snug.
- 04
Screw on the planks
Lay the five planks (A) across the frame, edges tight, ends flush. Glue the frame where the planks land on it and drive 1¼″ screws through the planks into the frame: two per plank into each rail, along the stiles, and along each brace.
- 05
Sand and finish the door
Sand the door with 120 then 180 grit, the stiles (B), rails (C) and braces (D) too, and ease the edges. Stain or paint it and seal both faces and all four edges the same, so it stays flat.
- 06
Screw the header to the studs
Find the studs above the opening with a stud finder and mark them. Hold the header (E) level across them, its bottom just above the door casing, with 36¼″ of it past the opening on the side the door will slide to. Drive two 3″ structural screws into every stud.
Watch outThe header carries the whole door. Every screw must go into a stud, not just drywall. - 07
Bolt on the track
Follow your kit's instructions. Hold the track level on the header with its spacers behind it, bolt holes over the studs, and drive the lag bolts through the track and spacers into the header and studs.
- 08
Hang the door
Bolt the two hangers to the top of the door, centered on the stiles (B), with the bolts from the kit going right through the door. With a helper, lift the door and set the hanger wheels on the track.
- 09
Add the stops and the floor guide
Slide the door open and closed. Clamp a stop on the track at each end of its travel, where the door covers the opening when closed and clears it when open. Screw the floor guide to the floor at the edge of the opening so the door can't swing out at the bottom.
Watch outWithout the stops and the floor guide, the door can roll off the end of the track or swing into someone. Fit both before anyone uses it. - 10
Add a handle
Screw a pull handle to the front at a comfortable height, about 36″ from the floor, and a flush pull on the back if you want to close it from the other side. Slide it a few times and check that it runs smooth and quiet.
Build at your own risk. Check every measurement against your own lumber before you cut, test-fit before you glue, and wear eye and ear protection. Full disclaimer.