Bluebird Nest Box
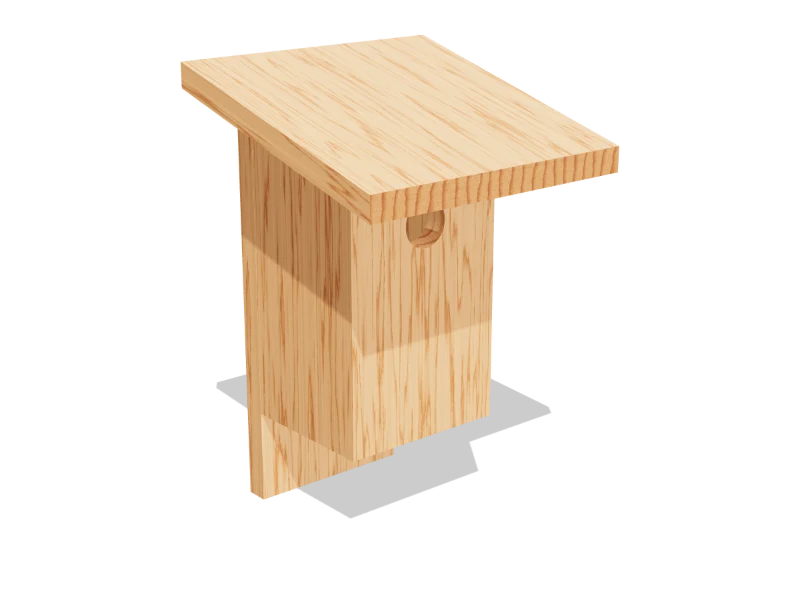
A cedar nest box built to the North American Bluebird Society's recommendations: a 1½″ entrance 5″ above a drained 4″ floor, vents, a deep roof overhang, and a door that swings open for cleaning.
- Skill
- Level 3 of 5 · Intermediate
- Build time
- 2 to 3 hours, plus finish
- Lumber
- 1 1x6 and 1 1x10
- Joinery
- Exterior screws and pivot nails
- Finished size
- about 9¼″ W × 8¾″ D × 14¼″ H
What you need
A 1x6 is actually ¾″ × 5½″ and a 1x10 is ¾″ × 9¼″. Every measurement in this plan uses the real size.
Shopping list
- 11x6, 6 ftCedar. Back, sides, door and floor.
- 11x10, 6 ftCedar. The roof; the rest makes more roofs.
- ~201⅝″ exterior screwsStainless or coated.
- 22″ galvanized finishing nailsThe door pivots.
- 11⅝″ exterior screwHolds the door shut.
- opt.Metal pole and predator baffleFor mounting.
Tools
- Table sawFor ripping the sides and door.
- Miter sawFor the 15° cuts.
- Drill/driverWith a 1½″ Forstner or spade bit and a ⅜″ bit.
- Tape measure, speed square, pencil
Cut list
Six pieces from two boards. Label each piece with its letter in pencil as you cut it.
| Part | Qty | Size, inches | From |
|---|---|---|---|
| ABackTop cut at 15°. | 1 | ¾ × 5½ × 13⅝ | 1x6 |
| BSidesRipped to 4¾″ wide, top cut at 15°. | 2 | ¾ × 5½ × 10½ | 1x6 |
| CFront doorRipped to 4″ wide. | 1 | ¾ × 5½ × 8¾ | 1x6 |
| DFloorCut to 4″ × 4″ with the corners clipped. | 1 | ¾ × 5½ × 4½ | 1x6 |
| ERoofBoth ends cut at 15°, parallel. | 1 | ¾ × 9¼ × 9¼ | 1x10 |
Board layout. Each row is one board, cut left to right, with the remainder hatched. Dark lines are saw cuts, about ⅛″ wide.
Hardware & tools
Everything besides the lumber, with a link for each.
Links go to Amazon. Woodable earns a small commission at no cost to you.
Hardware
- Metal pole and predator baffleFor mounting.opt.View on Amazon
Fasteners
- 1⅝″ exterior screwsStainless or coated.~20View on Amazon
- 2″ galvanized finishing nailsThe door pivots.2View on Amazon
Tools
- Table sawFor ripping the sides and door.View on Amazon
- Miter sawFor the 15° cuts.View on Amazon
- Drill/driverWith a 1½″ Forstner or spade bit and a ⅜″ bit.View on Amazon
- Tape measure25 ft tape measure.View on Amazon
- Speed square7″ rafter square for marking and guiding cuts.View on Amazon
Build it
Seven steps. The 3D view follows along as you scroll. The parts you're working on are yellow, and the pocket holes or screws for that step are red.
- 01
Cut the pieces
Cut the blanks to length:
- A Back, one at 13⅝″
- B Sides, two at 10½″
- C Front door, one at 8¾″
- D Floor, one at 4½″
- E Roof, one at 9¼″
Rip the sides (B) to 4¾″ wide and the door (C) to 4″ wide on a table saw. Cut the floor (D) to 4″ square and clip each corner ½″ so water drains out.
- 02
Cut the angles and drill the holes
Set the miter saw to 15°. Cut the top of each side (B) so it runs from 10¼″ at the back to 9″ at the front, and cut the top of the back (A) and both ends of the roof (E) at the same angle.
Drill the 1½″ entrance hole in the door (C), centered across it, with its center 6¾″ up from the bottom. Drill three ⅜″ vent holes high on each side, just under the roof line, angled slightly up from outside so rain can't blow in.
Watch outDon't add a perch. Bluebirds don't need one, and it helps House Sparrows harass them. - 03
Join the sides to the back
Stand the two sides (B) on their front edges and lay the back (A) across their back edges, tops flush, so 3″ of the back hangs below for mounting. Drive three 1⅝″ exterior screws through the back into each side.
- 04
Fit the floor
Slide the floor (D) between the sides, against the back, its bottom ¼″ up from the bottom of the sides. Nail or screw through each side into its edges.
- 05
Hang the door
Set the door (C) between the sides with a ¼″ gap at the top for air. Drive one galvanized nail through each side into the door's edges, ¾″ below its top, exactly level with each other: the door swings out on these two nails.
Drill a pilot hole through one side into the door near the bottom and drive a screw to hold it shut. Take that screw out to open the door and check the nest.
- 06
Screw on the roof
Lay the roof (E) on the sides and back, flush with the back of the box so it covers the top of the back, overhanging evenly at the sides. Screw it down into the sides and the back.
- 07
Finish and mount it
Leave cedar bare, or paint only the outside with a light-colored water-based paint so the box doesn't overheat. Never paint or stain the inside.
Mount it on a metal pole with the entrance at least 5 ft off the ground, facing open grassland, with a predator baffle below the box. Clean out old nests after each brood.
TipCheck the box once a week in nesting season. Open the door quietly, take a quick look and close it.
Build at your own risk. Check every measurement against your own lumber before you cut, test-fit before you glue, and wear eye and ear protection. Full disclaimer.