Kids' Art Easel
A sturdy A-frame easel for two young artists: a chalkboard on one side, a whiteboard on the other, a tray under each and a paper roll across the top. Under 36″ tall, and chains keep it from spreading.
- Skill
- Level 2 of 5 · Beginner
- Build time
- 4 to 6 hours, plus finish
- Lumber
- 2 2x2s, 1 2x4, 1 1x4, 1 1x2 and 1 panel of ¼″ plywood
- Joinery
- Pocket holes, glue, screws and brads
- Finished size
- about 26″ W × 21⅞″ D × 35¾″ H
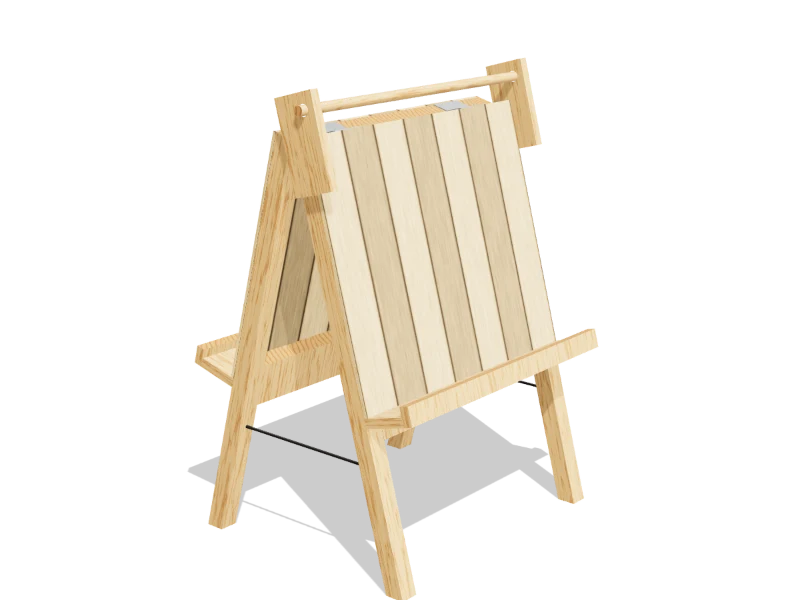
What you need
A 2x2 is actually 1½″ × 1½″, a 2x4 is 1½″ × 3½″, a 1x4 is ¾″ × 3½″ and a 1x2 is ¾″ × 1½″. Every measurement in this plan uses the real size. ¼″ plywood is drawn at full thickness, but plywood sold that way is often a hair thinner, so measure yours and cut the pieces that fit between panels to match.
Shopping list
- 22x2, 8 ftThe legs. Sight down each one to make sure it's straight.
- 12x4, 8 ftThe rails.
- 11x4, 6 ftTrays and roll arms.
- 11x2, 6 ftTray lips.
- 1¼″ plywood, 2 × 4 ft panelSmooth ¼″ hardboard paints best. ¼″ birch plywood works too.
- ~202½″ coarse-thread pocket-hole screws
- ~102½″ wood screwsFor the trays.
- ~201⅝″ wood screwsFor the tray lips and roll arms.
- ~40¾″ brad nailsFor the boards.
- 23″ butt hingesWith their screws.
- 4Eye screwsAbout 1½″.
- 1Light chain and S-hooksAbout 2 ft of chain and four S-hooks.
- 1¾″ hardwood dowel, 36″For the paper roll. Cut it to 26″.
- 1Easel paper roll, 18″ wideRolls up to about 3½″ across fit.
- 1Chalkboard paintFor one board.
- 1Dry-erase paintFor the other board.
- 1Wood glue
- —Toy-safe water-based finish, sandpaperFor the frames, trays and arms.
Tools
- Miter sawFor the 15° leg cuts.
- Circular sawFor the boards, or have the store cut them.
- Pocket-hole jigSet for 1½″ stock.
- Drill/driver with a ⅞″ spade bit
- Brad nailer or hammer
- Clamps
- PliersTo close the S-hooks.
- Sander
- Tape measure, speed square, pencil
Cut list
Sixteen pieces from five boards and one panel. Label each piece with its letter in pencil as you cut it.
| Part | Qty | Size, inches | From |
|---|---|---|---|
| ALegsBottom end cut at 15°. | 4 | 1½ × 1½ × 33½ | 2x2 |
| BRails | 4 | 1½ × 3½ × 20½ | 2x4 |
| CBoardsSmooth hardboard or plywood. | 2 | ¼ × 20 × 23½ | ¼″ plywood |
| DTrays | 2 | ¾ × 3½ × 23½ | 1x4 |
| ETray lips | 2 | ¾ × 1½ × 23½ | 1x2 |
| FRoll armsWith a ⅞″ hole. | 2 | ¾ × 3½ × 7 | 1x4 |
Board layout. Each row is one board, cut left to right, with the remainder hatched. Dark lines are saw cuts, about ⅛″ wide.
Hardware & tools
Everything besides the lumber, with a link for each.
Links go to Amazon. Woodable earns a small commission at no cost to you.
Hardware
- 3″ butt hingesWith their screws.2View on Amazon
- Eye screwsAbout 1½″.4View on Amazon
- Light chain and S-hooksAbout 2 ft of chain and four S-hooks.1View on Amazon
- Easel paper roll, 18″ wideRolls up to about 3½″ across fit.1View on Amazon
Fasteners
- 2½″ coarse-thread pocket-hole screws#8 × 2½″, coarse thread, washer head. For joining 1½″ boards.~20View on Amazon
- 2½″ wood screwsFor the trays.~10View on Amazon
- 1⅝″ wood screwsFor the tray lips and roll arms.~20View on Amazon
- ¾″ brad nailsFor the boards.~40View on Amazon
Glue & finish
- Chalkboard paintFor one board.1View on Amazon
- Dry-erase paintFor the other board.1View on Amazon
- Wood gluePVA wood glue for indoor projects.1View on Amazon
- Sandpaper5″ hook-and-loop discs for a random orbit sander, 80 to 220 grit.View on Amazon
- Toy-safe finishWater-based paint or clear finish labeled safe for toys once dry.View on Amazon
Tools
- Miter sawFor the 15° leg cuts.View on Amazon
- Circular sawFor the boards, or have the store cut them.View on Amazon
- Pocket-hole jigSet for 1½″ stock.View on Amazon
- Drill/driverCordless drill/driver with bits.View on Amazon
- Spade bit setSpade bits from ¼″ to 1½″.View on Amazon
- Brad nailer or hammer18 gauge brad nailer that takes ¾″ to 2″ brads.View on Amazon
- ClampsTwo or more bar clamps that open 24″ or more.View on Amazon
- Sander5″ random orbit sander.View on Amazon
- Tape measure25 ft tape measure.View on Amazon
- Speed square7″ rafter square for marking and guiding cuts.View on Amazon
Build it
Ten steps. The 3D view follows along as you scroll. The parts you're working on are yellow, and the pocket holes, screws and brads for that step are red.
- 01
Cut the pieces
Cut every piece on the cut list:
- A Legs, four at 33½″
- B Rails, four at 20½″
- C Boards, two at 20″ × 23½″
- D Trays, two at 23½″
- E Tray lips, two at 23½″
- F Roll arms, two at 7″
Cut the bottom end of each leg (A) at 15°, so the leg stands flat when it leans. The 33½″ length is the long side of the cut, the outside of the leg. Cut the top end square. Cut the dowel to 26″.
- 02
Drill the arms and round the corners
Clamp the two roll arms (F) together and drill a ⅞″ hole through both, 1¼″ from the top end and 1″ in from the front edge. The dowel turns freely in it.
Round the corners of the arms, the trays (D), the tray lips (E) and the boards (C) with sandpaper. Little hands and faces are at this height.
- 03
Drill the pocket holes
With the jig set for 1½″ stock, drill two pocket holes at each end of all four rails (B), on the same face.
- 04
Paint the boards
Paint the smooth face of one board (C) with chalkboard paint and the other with dry-erase paint, following the can for the number of coats and the cure time. Use a small foam roller for a smooth surface.
TipBefore the first drawing, rub the side of a piece of chalk over the whole chalkboard and wipe it off. That seasons it, so the first pictures erase cleanly. - 05
Build the two frames
Lay two legs (A) on the bench, 23½″ apart at the outside, with the long sides of the foot cuts on the same face: that face is the outside of the frame. Fit a top rail (B) between them, flush with the tops, and a bottom rail (B) with its top edge 18½″ down from the top of the legs. Keep the pocket holes on the inside face. Glue and drive 2½″ pocket screws. Build a second frame the same way.
- 06
Nail on the boards
Lay each board (C) painted side up on the outside face of a frame, flush with the top and both sides. Its bottom edge lands on the bottom rail. Glue and nail it on with ¾″ brads every 5″ or so along the legs and rails.
- 07
Add the trays
Hold each tray (D) square to the board, tight under its bottom edge and flush with the sides. Drive three 2½″ screws from the inside of the frame through the bottom rail into the back edge of the tray. Glue a tray lip (E) on edge along the front of the tray, sticking up ¾″, and screw it on with 1⅝″ screws.
TipThe trays sit square to the boards, so they slope back 15° and chalk rolls into the corner instead of off the front. - 08
Hinge the frames and add the chains
Stand the two frames back to back, boards facing out, with the top rails (B) touching and their top edges flush. Screw two 3″ butt hinges across the top edges, 3″ in from each side, with the pins right at the joint and the knuckles up.
Stand the easel up and spread the legs until the feet are about 20¼″ apart, front to back, at the outside. Screw an eye screw into the inside face of each leg, 9⅜″ up from the bottom. Join each front eye screw to the back one with chain, pulled snug, and close the S-hooks with pliers.
Watch outThe chains are what stop the easel from spreading flat. Check them and the eye screws before kids use it, and every few months after. - 09
Add the paper roll
Screw a roll arm (F) to the outer side of each leg of the chalkboard frame, its back edge flush with the inside face of the frame, with 3″ sticking up above the top of the leg and the hole toward the board. Two 1⅝″ screws into each leg.
Slide the dowel through one arm, the paper roll and the other arm. Pull the paper down over the board and clip the end to the tray lip with two binder clips. Tear it off over the top edge of the board.
- 10
Finish
Sand every edge and corner round with 120 then 180 grit, the tops of the legs and the arms especially. Seal the frames, trays and arms with a finish that's labeled safe for toys once it has cured, and let it cure fully before kids use it. Keep the finish off the painted faces of the boards.
Watch outThe trays hold chalk and markers. They aren't steps: don't let kids stand on them or climb the easel. Fold the easel only when kids are clear, because the top hinge and the legs can pinch fingers as it closes.
Build at your own risk. Check every measurement against your own lumber before you cut, test-fit before you glue, and wear eye and ear protection. Full disclaimer.