Cat Litter Box Cabinet
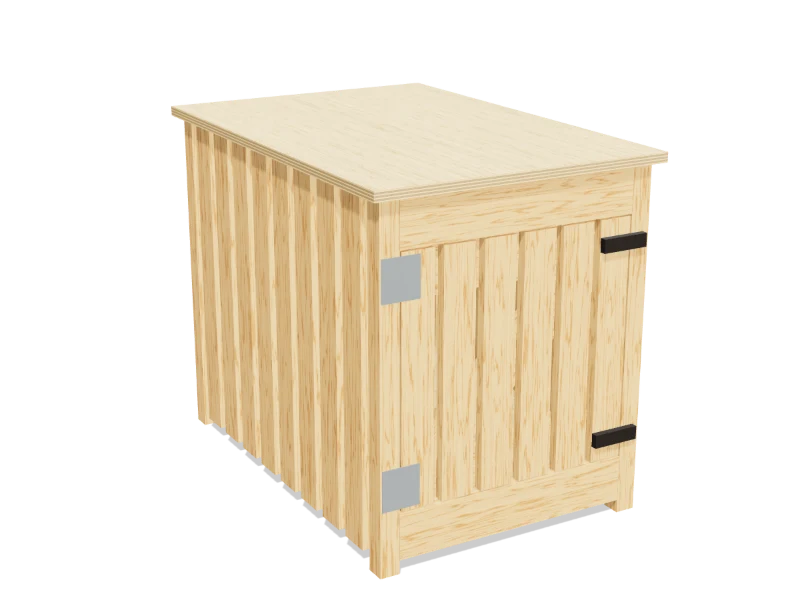
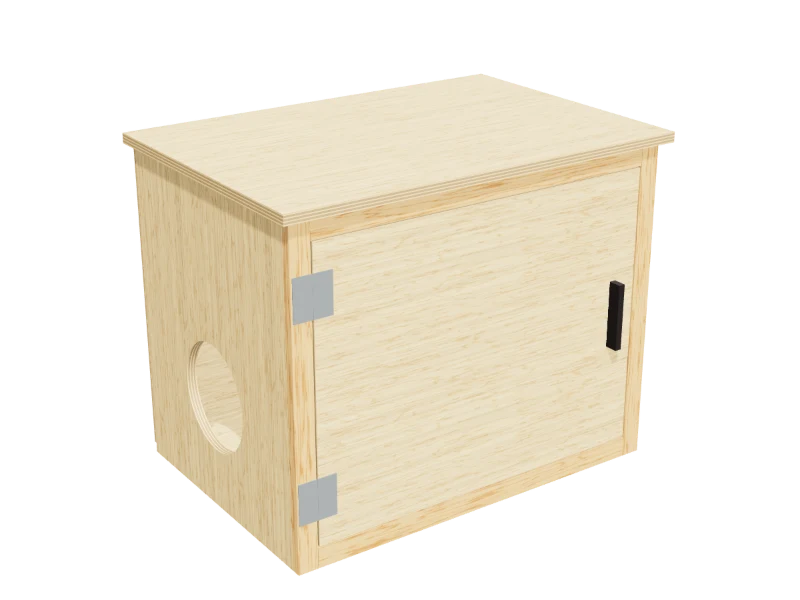
A plywood cabinet that hides a large litter box: a round cat door in one side, vent holes high in the other, and a front door that opens wide for scooping.
- Skill
- Level 2 of 5 · Beginner
- Build time
- 5 to 7 hours, plus finish
- Lumber
- 2 1x2s, 1 sheet of ¾″ plywood and 1 panel of ¼″ plywood
- Joinery
- Pocket holes, glue and brads
- Finished size
- 31½″ W × 22″ D × 25″ H
What you need
A 1x2 is actually ¾″ × 1½″. Every measurement in this plan uses the real size. ¾″ plywood and ¼″ plywood are drawn at full thickness, but plywood sold that way is often a hair thinner, so measure yours and cut the pieces that fit between panels to match.
Shopping list
- 11x2, 8 ftSelect pine or poplar. The face frame and door stop.
- 11x2, 6 ftSelect pine or poplar. The face frame and door stop.
- 1¾″ plywood, 4 × 8 ft sheetBirch or another smooth hardwood plywood paints best.
- 1¼″ plywood, 2 × 4 ft panelThe back.
- ~201¼″ coarse-thread pocket-hole screws
- ~401¼″ brad nails
- 23″ butt hingesWith their screws.
- 1Cabinet pullWith screws long enough for a ¾″ door.
- 1Magnetic cabinet catchWith its strike plate and screws.
- 1Wood glue
- —Sandpaper, 120 and 180 grit
- 1Pet-safe water-based paint or clear finishLabeled safe for toys or pets once cured.
Tools
- Circular sawOr have the store cut the plywood.
- JigsawFor the cat door.
- CompassOr a string and a pencil.
- Hole saw1½″, for the vents. Or a Forstner bit.
- Pocket-hole jigSet for ¾″.
- Drill/driver
- Brad nailer or hammer
- Clamps
- Tape measure, square, pencil
Cut list
Eleven pieces from two boards and two panels. Label each piece with its letter in pencil as you cut it.
| Part | Qty | Size, inches | From |
|---|---|---|---|
| ASidesLeft: the cat door. Right: the vent holes. | 2 | ¾ × 20 × 24¼ | ¾″ plywood |
| BBottom | 1 | ¾ × 20 × 28½ | ¾″ plywood |
| CTop | 1 | ¾ × 21¾ × 31½ | ¾″ plywood |
| DBack | 1 | ¼ × 23½ × 30 | ¼″ plywood |
| EFace frame stiles | 2 | ¾ × 1½ × 24¼ | 1x2 |
| FFace frame rails | 2 | ¾ × 1½ × 27 | 1x2 |
| GDoor stop | 1 | ¾ × 1½ × 27 | 1x2 |
| HDoor | 1 | ¾ × 26¾ × 21 | ¾″ plywood |
Board layout. Each row is one board, cut left to right, with the remainder hatched. Dark lines are saw cuts, about ⅛″ wide.
Hardware & tools
Everything besides the lumber, with a link for each.
Links go to Amazon. Woodable earns a small commission at no cost to you.
Hardware
- 3″ butt hingesWith their screws.2View on Amazon
- Cabinet pullWith screws long enough for a ¾″ door.1View on Amazon
- Magnetic cabinet catchWith its strike plate and screws.1View on Amazon
Fasteners
- 1¼″ coarse-thread pocket-hole screws#8 × 1¼″, coarse thread, washer head. For joining ¾″ boards.~20View on Amazon
- 1¼″ brad nails18 gauge, 1¼″ long.~40View on Amazon
Glue & finish
- Wood gluePVA wood glue for indoor projects.1View on Amazon
- Sandpaper, 120 and 180 grit5″ hook-and-loop discs for a random orbit sander, 80 to 220 grit.View on Amazon
- Pet-safe water-based paint or clear finishLabeled safe for toys or pets once cured.1View on Amazon
Tools
- Circular sawOr have the store cut the plywood.View on Amazon
- JigsawFor the cat door.View on Amazon
- CompassOr a string and a pencil.View on Amazon
- Hole saw1½″, for the vents. Or a Forstner bit.View on Amazon
- Pocket-hole jigSet for ¾″.View on Amazon
- Drill/driverCordless drill/driver with bits.View on Amazon
- Brad nailer or hammer18 gauge brad nailer that takes ¾″ to 2″ brads.View on Amazon
- ClampsTwo or more bar clamps that open 24″ or more.View on Amazon
- Tape measure25 ft tape measure.View on Amazon
- Speed square7″ rafter square for marking and guiding cuts.View on Amazon
Build it
Nine steps. The 3D view follows along as you scroll. The parts you're working on are yellow, and the pocket holes and brads for that step are red.
- 01
Cut the pieces
Measure your litter box first. This cabinet takes an open box up to 24″ long, 18″ deep and 12″ tall, which fits most large and jumbo boxes. The door opening is 27″ wide and the inside is 22¾″ tall.
Cut every piece. Have the store rip the plywood into strips if the sheet won't fit in your car:
- A Sides, two at 20″ × 24¼″
- B Bottom, one at 20″ × 28½″
- C Top, one at 21¾″ × 31½″
- D Back, one at 23½″ × 30″
- E Face frame stiles, two at 24¼″
- F Face frame rails, two at 27″
- G Door stop, one at 27″
- H Door, one at 26¾″ × 21″
TipCut the door (H) last, after the face frame is on, and check it against the real opening. It should leave a ⅛″ gap all round. - 02
Cut the cat door and vent holes
On the left side (A), mark the cat door: an 8″ circle, centered front to back, its center 8½″ up from the bottom edge. Draw it with a compass or a string and pencil, drill a ½″ starter hole inside the line, and cut it out with a jigsaw.
On the right side (A), drill five 1½″ vent holes in a row 3¼″ down from the top edge, spread evenly front to back. Use a hole saw or a Forstner bit.
Sand the edges of every hole round and smooth so they can't snag fur.
TipThe vents sit high on the side across from the cat door, so fresh air comes in low and stale air goes out high. Put the cat door on the right instead if that suits your room: just swap the two sides. - 03
Drill the pocket holes
With the jig set for ¾″, drill:
- three pocket holes along each end of the bottom (B), on its underside
- three along the top edge of each side (A), on the inside face
- one at each end of the two face frame rails (F), on the back face
- 04
Build the case
Stand the two sides (A) up and fit the bottom (B) between them, ¾″ up from the floor, flush with the front and back edges. Glue and drive 1¼″ pocket screws up through the bottom into the sides.
TipStand the bottom on two ¾″ scraps while you screw. It comes out level and the same height at both ends. - 05
Add the top
Lay the top (C) upside down on a blanket. Center the case upside down on it, flush at the back, with ¾″ of overhang at each side and 1½″ at the front (room for the face frame). Drive 1¼″ pocket screws through the sides into the top.
- 06
Add the face frame and door stop
Lay the two stiles (E) on the bench and fit the two rails (F) between them, the bottom rail flush with the bottom ends and the top rail flush with the top ends. Glue and drive 1¼″ pocket screws.
Glue the face frame to the front edges of the case, flush with the outside of the sides and tight under the top, and nail it on with 1¼″ brads. The top of the bottom rail lines up with the top of the bottom (B), so the litter box slides straight out.
Glue the door stop (G) to the back of the top rail, its lower edge ½″ below the rail, and nail it from behind. The door closes against it.
- 07
Nail on the back
Lay the cabinet face down. Measure both diagonals across the back and push the case until they match. Glue and nail the back (D) to the sides and the bottom with 1¼″ brads every 5″ or so.
- 08
Hang the door
Round over the edges of the door (H) and check it in the opening on ⅛″ spacers. Lay two 3″ butt hinges flat across the joint between the left stile and the door, 2″ and 16″ up from the bottom of the door, with their pins right at the gap. Screw them on with the screws that come with them.
Screw the pull near the right edge of the door. Screw the magnetic catch under the door stop (G) and its plate to the back of the door, so the door clicks shut flush with the face frame.
Watch outKeep fingers and paws clear of the hinge side as the door closes. It can pinch. - 09
Seal and finish
Sand everything with 120 then 180 grit and round every edge the cat or your hands will touch. Brush three coats of water-based polyurethane or paint inside, the bottom (B) especially, so spills can't soak into the plywood. Paint or stain the outside to match your room.
Let the finish cure for a full week, with the door open, before the cat uses it.
Set the litter box inside against the right side, so the cat lands on the floor of the cabinet before it steps into the box. Show your cat the door with a treat, and leave the old box out for a few days while it gets used to the new one.
Watch outUse a finish labeled safe for pets or toys once cured, and keep the vent holes clear. Scoop daily: the cabinet hides the box, but the cat still needs fresh air in there.
Build at your own risk. Check every measurement against your own lumber before you cut, test-fit before you glue, and wear eye and ear protection. Full disclaimer.